Our firsthand experience dealing with a plumbing disaster to help homeowners in a similar situation learn of the many innovative options that do not involve pulling up your floors or digging up your lawn.
A Christmas Eve Plumbing Story
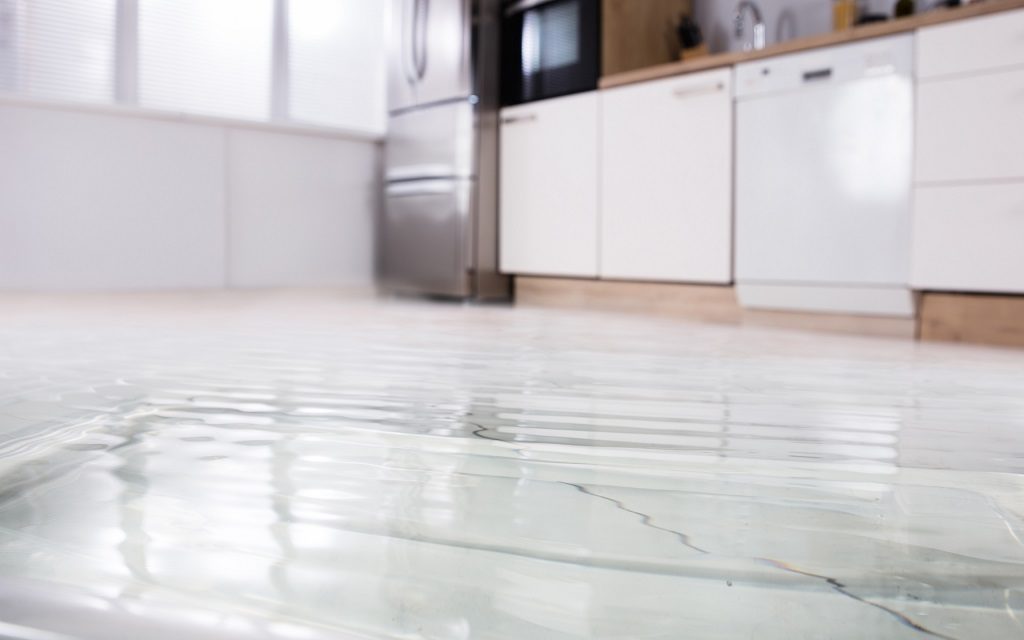
Perhaps one of the worst disasters a homeowner can encounter is a sewer line leak that appears suddenly, at the worst time. On Christmas Eve, after washing up a few dishes and closing up the kitchen for the night, I retired to the upstairs. After thirty minutes, my husband went down to the kitchen and noticed a puddle of water on the floor about four feet from the base of the kitchen sink.
As he walked up the stairs to the bedroom, he called out to ask why there was water on the kitchen floor. I responded that I didn’t know. We both went back down to the kitchen to investigate the water’s source only to realize that it was percolating from the grout lines of the stone tiled floor.
We knew we had a plumbing problem.
Here’s our firsthand experience on how we are dealing with this dreaded situation and the options we are considering for full, long-term mitigation. We have included lessons learned for homeowners to be diligent and alert to signs of impending plumbing issues.
Table of Contents
- Preventing a Plumbing Disaster
- How to Diagnose Issues with Your Sewer Pipe
- How to Regain Temporary Usage of Your Sewer Line
- Options for Repairing a Damaged Sewer Pipe
- Pros & Cons of Mitigation Solutions
- Tips on Hiring a Plumber to Fix Your Sewer Pipe
- Additional Questions & Answers
- Trenchless Repair Resource Links
- Recommended Reading
UPDATE – Here are the second and third parts of this series which share our experiences with various types of contractors, as well as lessons learned from the proposal and diagnostic phase, and how we achieved final remediation:
Preventing a Plumbing Disaster
Before diving into the details of our plumbing situation, here are proactive activities we strongly recommend that will help reduce the chances of an unexpected breakdown, as well as the potential damage should such an event occur.
- Look, Listen and Smell for Signs of Plumbing Failures
- Know Your Home’s Plumbing Architecture
- Have Tools to Assess Your Plumbing Infrastructure
- Schedule Periodic Pipe Inspections & Cleanout
Look, Listen and Smell for Signs of Plumbing Failures
Signs to look for that may indicate your sewer line may need to be repaired or replaced include:
- Persistent backups from multiple plumbing connection points
- Slow drains
- Sewer odors
- Foundation cracks due to shifting, moist soil
- Wall damage
- Unusual patches in your surrounding yard
Also see: Signs It May Be Time to Replace Your Piping.
Know Your Home’s Plumbing Architecture
When purchasing a new home, make sure to obtain an understanding of the overall architecture of your plumbing and sewer lines in case of a pipe blockage or system failure. If a licensed plumber cannot walk through your property and provide a schematic diagram, contact your local city records office. Request the original plans submitted by the design engineers, who would have obtained the building and planning permits for your property and any subsequent changes performed thereafter.
Have Tools to Assess Your Infrastructure
The following categories of tools can be effective at diagraming your home’s infrastructure, as well as detecting areas of moisture:
- Walabot Radar Imaging Device
- Moisture Meters
- Infrared/Thermal Imaging Cameras
Walabot Radar Imaging Device
The Walabot is a radar imaging device used with iOS and Android smart phones that can help homeowners detect and diagram their plumbing architecture, plus locate electrical wiring and studs. This is especially helpful when unable to obtain past records or if you are concerned about the cost of having this task performed by a professional.
A tool such as the Walabot can aid decision-making on gaining the best access points for hidden plumbing (and electrical) in walls and floors. The latest version, Walabot DIY 2, currently costs between $160 and $210, depending on options.
Moisture Meters
A moisture meter is an invaluable tool for homeowners, as it can be used to check for water intrusion and signs of mold throughout your home periodically as part of a proactive maintenance program. Moisture meters also have extended uses such as checking the dryness of firewood and dampness on painting surfaces. Prices can range between $20 and $500.
Infrared/Thermal Imaging Cameras
Infrared cameras are also helpful to diagnose the severity of leaks behind walls and floors. In short, these thermal imaging cameras can visually display varying temperatures of surfaces, which can indicate areas of concentrated moisture (cooler temperatures) or hot water leaks (warmer temperatures). This type of tool also has a wide range of uses, such as checking for HVAC air leaks and faulty circuits in electrical panels, which makes justifying this type of investment an easy decision. Popular DIY models will cost in the $200 to $500 range. The FLIR ONE Gen 3 and Seek Thermal CompactPRO are two popular models in this price range.
Schedule Periodic Pipe Inspections & Cleanout
Depending on the age of your home, and more specifically, the age of your plumbing, annual or bi-annual (every two years) camera inspections of your sewer drains can help bring peace of mind, as well as initiate budgeting plans for anticipated re-piping projects.
How to Diagnose Issues with Your Sewer Pipe
Knowing the plumbing architecture of your home is critical in situations like ours, as it can help you understand the route that various pipes and lines travel throughout your home. Armed with this knowledge, you can mitigate further damage by choosing alternate bathrooms, kitchen or sink use until you can effect a repair.
When water and debris are obstructed within the sewer line they will seek out the first crack or hole in the pipe, be it at the top, side or bottom of the cylinder. The result may manifest itself as pools of water on the surface of your flooring, or in the case of stone tile, darkening of the edges where the grout meets the tile. In the worst cases, wet drywall may be indicative of a sewer line breach, when pipes run vertically from upper to lower floors.
If you start noticing darkening stone tiles before you actually see water on the surface, this is probably a good indicator of sewer line deterioration.
In our case, we were able to deduce that the problem was not an incoming water line, but in fact a damaged drain pipe (sewer pipe) underneath the subfloor. This test was conducted by comparing results of letting running water go through the drain of the kitchen sink versus capturing the running water from the faucet in a bucket. Water that ran through the drain eventually seeped through the grout lines of the tiles.
Preventing Further Damage
Even though we needed the kitchen sink to prepare Christmas dinner, we understood that water into the kitchen sink drain would cause more damage, as it flowed through the cracked sewer line and seeped through the grout lines.
Out came our trusty, blue bucket to capture any water out of the kitchen faucet and to serve as a sink after the meal to allow us to wash up, without adding more water into the drain and subfloor.
Getting a Professional Assessment
We called several plumbers, but of course it being a holiday, they were closed for the week or unavailable for a few days, so we waited for the call backs. Luckily, we were able to secure an appointment for the next working day.
We repeated our story to the plumber, who listened for clues as to the source of the problem. It was clear to him that there was a sewer line backup or blockage that was causing the buildup of water in the kitchen which egressed through the grout lines. He further assessed that there was most likely a deteriorated sewer line from which water was seeping out and into the grout lines.
How to Regain Temporary Usage of Your Sewer Drain
Temporary Mitigation: Hydro Jet to the Rescue
While reaching out to plumbers, we knew up front that we needed a visual inspection using a video camera, as well as a thorough cleaning with a hydro jet. Do not assume that all plumbers have these types of equipment, or if they do, that they have it readily available for your job site. Be sure to confirm upfront what you are expecting from your hired plumber.
Fortunately for us, our sewer pipe was found to be in good enough condition to withstand a hydro jet cleaning. For weaker pipes, hydro jetting may cause additional damage.
Clearing the obstruction or blockage will allow a free flowing sewer line, although it will just be a temporary solution. In order to regain peace of mind, you will need to have the piping further assessed and either repaired or replaced before you can return to normal usage.
Camera Inspection
After our drain was hydro-jetted, a video camera inspection was conducted to evaluate the health of our piping. As expected, our kitchen drain piping needed to be repaired or replaced. However, the inspection also confirmed the layout and health of additional plumbing, which gave us more options on how to deal with the current situation.
The inspection also enabled our lines to be marked with specific locations of pipe connections, so we knew how much pipe needed to be repaired, their diameters, and the effected flooring.
Redirect Plumbing Usage to Prevent Further Damage
Since the pipes may be damaged or corroded, it is advisable to cease adding to the subfloor dampness and redirect your water usage. If you need to use an area affected by the corroded drain pipes, mitigate the damage.
In our case, using a bucket to catch faucet water, thereby by-passing the drain, was implemented to allow us to continue to use our kitchen, as we waited for our plumber’s proposal and floor reconstruction plans.
Fortunately, our sewer line issue was an isolated artery that enabled the other side of our home to be functional, thus relegating us to one bathroom.
Options for Repairing a Damaged Sewer Pipe
Though it is understandable to envision a worst case scenario of having to open walls and floors, or dig up landscaping to repair or replace an existing sewer line, this is not always the case.
When exploring solutions and vetting plumbing firms be sure to be aware of current technologies and approaches before choosing a course of action. Options can vary widely in terms of total cost, time-to-completion, long-term peace of mind, and overall convenience.
There are two general approaches to fixing a home’s sewer line:
- Traditional Trenching
- Trenchless Pipe Replacements & Repairs
Traditional Trenching
Traditional trenching involves digging ground or demolishing flooring or walls to access existing piping. This approach is typically used when a pipe has collapsed or is missing major sections.
Traditional trenching replacement is also a common choice when expanding this type of plumbing project into a renovation “opportunity”, as in upgrading your flooring or cabinetry. If taking on an additional renovation budget is daunting, we would recommend looking for financing options in order to get the situation thoroughly corrected for the long haul.
Synchronizing home improvement projects can also dramatically reduce the inconvenience of having various parts of your home out-of-commission for prolonged periods of time.
Traditional methods of replacing piping is best for situations under the following circumstances:
- Flooring is outdated and needs to be upgraded
- Budget is flexible and not a heavy financial burden
- Timing and scheduling is flexible
- You have a reliable GC that is available to handle all aspects of the project
- You have concerns over your hidden infrastructure and opening up your space would bring you long-term peace of mind
Trenchless Pipe Replacements & Repairs
For homeowners worried about the inconvenience, cost and time necessary to correct a faulty sewer line, they will be relieved to know that there are several less-invasive methods that can solve their problem expediently and reliably. Regardless of which method you choose, it is imperative to weigh all viable options and estimates before signing a contract.
Methods of Trenchless Pipe Repair
Trenchless pipe repair and replacement involves newer technology and methods that can repair or replace existing pipes with minimal need to open up floors, walls or destroying landscaping or concrete driveways. Most vendors in the trenchless practice state that repaired pipes will be as reliable as new pipe, with life expectancies over 50 years.
There are currently four methods of trenchless pipe repair:
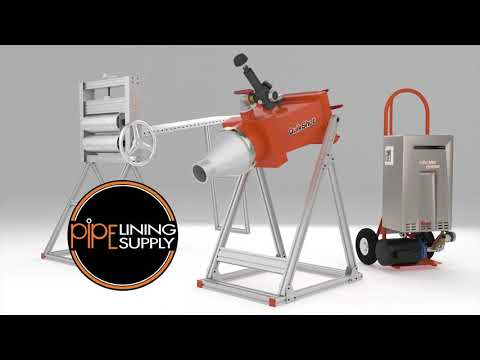
CIPP Pipe Lining
Pipe Lining is also referred to as CIPP (cured-in-place pipe lining), structural pipe lining or a sewer sleeve. This is a more advanced version of slip lining, as it uses epoxy to reinforce and seal a weakened pipe from the inside. An inflation tool (a balloon-like inner tube) is used to expand the inserted lining so that the epoxy hardens in the shape of the original pipe walls.
When fully cured, the inflatable liner is removed. A limitation of this method is that it reduces the diameter of the repaired pipe. CIPP should not be used for pipes that have been repaired multiple times or if the reduced size of the pipe is insufficient for the intended usage.
This technology was first developed in Europe in the 1970s, but has been gaining wider adoption for residential applications in the United States over the past twenty years.
A drawback of CIPP is that it does not perform well on smaller pipes with diameters of 2 inches or less, or with pipes that have many bends. For smaller pipes and pipes with bends, spray lining is a better solution. CIPP also does not work with Orangeburg (tarpaper) pipes, a wood-based piping found in older homes.
The latest trend in CIPP technology is using Glass Reinforced Plastic (GRP) liner with a UV light curing process, for shorter repair times, reduced risk, and greater strength and durability.
Quik-Shot System, CIPP from Pipe Lining Supply
Pipe Bursting
Pipe Bursting (developed in the 1970s and commercialized in the early 1980s) is a newer method of pulling a replacement pipe (typically made of HDPE: High-Density Polyethylene) through the existing damaged pipe. This is possible using a winch with a cone-shape head that breaks up (bursts) the existing pipe as it is pulled through the existing line.
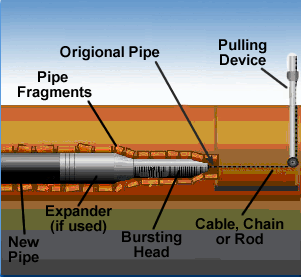
Image courtesy of Engineered Lining Systems.
A unique advantage of this process is being able to install a wider pipe. In fact, pipe bursting is the only trenchless pipe restoration method where it is possible to increase the size of the restored pipe.
Though excavation is still necessary (at the entry and exit points of the pipe being replaced), the amount of demolition or digging is considerably less compared to traditional trenching methods. This is a popular method when replacing residential sewer lines that run from the house to the street or city-sewer connection.
Sewer Pros: Pipe Bursting for Residential Lateral Lines Animation Video
Pipe Spraying
For pipes that are too narrow for CIPP, pipe spraying the pipe interior with a resin is a viable option. This method is similar to CIPP with the exception that it does not require a physical liner for the application process.
Flexible resins are preferred in environments that may be prone to movements, such as vertical pipes in high rise buildings or earthquake zones. Rigid epoxy, on the other hand, may be prone to cracking when withstanding too much movement.
This method is ideal for curtailing corrosion in cast iron pipes, eliminating sewer gas from faulty joints, and can be used on pipes as small as 1.5 inches in diameter to 6 inches in diameter. Pipe spraying, unlike pipe bursting, only requires having a single access point, such as the cleanout.
This efficient lining process offers short curing times (e.g. under an hour), and most single application lining jobs are completed within a few hours. Exact curing times and total completion times will depend on the specific products and tools used.
The pipe spraying process consists of the following steps:
- Video Pipe Inspection
- Pipe Cleaning & Descaling
- Spray Coating (multiple coats)
- Curing Process (from minutes to a few hours)
- Final Video Pipe Inspection
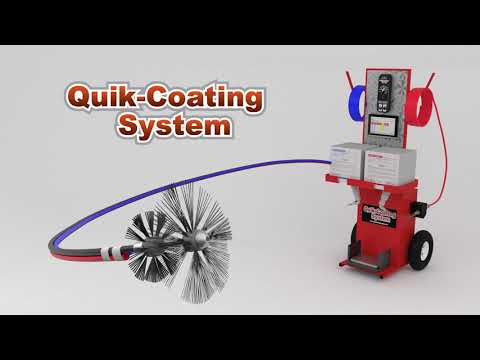
Quik-Coating System from Pipe Lining Supply
How Pipe Coating and Pipe Lining (CIPP) Go Together
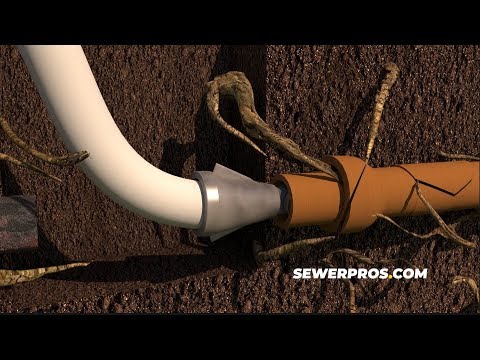
Slip Lining
Slip Lining is likely the original method of trenchless sewer line repair, which involves running a smaller, “carrier” pipe into the existing larger, “host” pipe to fix leaks and frail sections of the existing pipe. This method has been used since the 1940s. The slip liner is commonly made from plastic materials. A drawback of this method, like CIPP, is that it decreases the overall diameter, and thus may restrict flow of the pipe being repaired. The inserted pipe is inflexible, thereby limiting its use to areas with no curvature or bends. Slip lining is still used primarily for very large, public utility drains.
Pipe bursting can be viewed as an evolutionary step-up from the slip lining method.
Pros & Cons of Sewer Line Mitigation Solutions
- Benefits of Traditional Pipe Repair
- Limitations of Traditional Pipe Repair
- Benefits of Trenchless Pipe Repair
- Limitations of Trenchless Pipe Repair
Benefits of Traditional Pipe Repair
Though traditional methods may seem overly burdensome when compared to trenchless approaches, the primary benefits of the traditional approach are still important to consider:
- A larger pool of well-qualified local plumbers and general contractors will be available to repair and restore your home
- If you plan to upgrade your affected flooring, the traditional method is the better approach, especially if you hire a general contractor to manage the entire project
- The traditional method will open up affected spaces for the most accurate diagnosis
- The traditional approach may provide more peace of mind to homeowners who prefer all new piping and in-person, firsthand diagnosis
Limitations of Traditional Pipe Repair
The biggest drawbacks of traditional pipe repair can be summarized as:
- More costly than trenchless due to having to repair or replace affected flooring, walls, and external grounds
- Longer time to full resolution due to having to remove flooring and walls, dig trenches and patch affected areas
- More complicated logistics, especially if hiring separate plumbing, flooring and finishing contractors
Benefits of Trenchless Pipe Repair
Trenchless pipe repair offers several benefits, all largely stemming from the fact that it is less invasive and takes significantly fewer days to reach a full resolution.
- Faster than Traditional Methods
- Cost-Effective
- Less Invasive
- Minimal Destruction to Property
- Proven Long-Lasting Effectiveness
When comparing cost proposals, keep in mind that traditional plumbing methods will not include additional work necessary to return your interior and exterior spaces to original form. These supplemental costs, including materials and labor, to repair walls, flooring, exterior siding, lawns and driveways could be as much, if not more, than the plumbing costs themselves.
The most popular benefit of trenchless pipe repair is the concept of a “Zero Dig” resolution which is possible by accessing the sewer pipe directly through the cleanout.
Limitations of Trenchless Pipe Repair
Not all sewer pipes are strong candidates for trenchless repair. If the host pipe is collapsed, back-pitched or missing major sections of pipe trenchless repair methods may not work.
Limitations of CIPP Pipe Lining
- Does not work well for oval shaped piping (e.g. orangeburg that has lost its shape)
- Can collapse during installation or years after in-use
- Some plumbers do not recommend for smaller, 2-inch piping
- There are risks involving the insertion of CIPP, such as the liner collapsing during installation
Limitations of Pipe Bursting
- Though considered trenchless, pipe bursting still requires two points of access to the section of pipe to be replaced
- In external residential situations two square trenches will likely need to be excavated, usually 4’x4′
- Typically the pipe being replaced needs to be longer than 15 feet to facilitate sufficient spacing between the two end trenches
Limitations of Pipe Spraying
- Works best for smaller pipes, typically 1.5” to 6” in diameter
- Cracks and holes in existing pipe cannot be too large
Tips on Hiring a Plumber to Fix Your Sewer Pipe
- Investigate what technologies a vendor uses and for which he is certified. Also inquire as to the length of time and experience he has had employing these technologies
- Don’t expect a traditional plumber to be able to use the latest in trenchless solutions,
- When hiring a plumber to perform a video camera inspection, confirm up front that the fee will include that you receive recorded video file or footage from the inspection
- Make sure that your plumber will have all expected equipment and tools necessary to complete the job before they arrive on site
- Request estimates from both traditional plumbers, as well as trenchless specialists
- Request estimates for additional work not covered by plumbing contractors (e.g. flooring, patching, etc.)
- Request estimates for the entire job from general contractors if considering extensive upgrades, such as flooring and cabinetry
- Confirm terms of Construction Warranty for work performed
- Confirm that all contacted contractors will provide a free on-site estimate
Licenses and certifications to look for:
- Plumbing License
- Sewer or Sanitation System License
- Repipe Lining System Certified Operator
- Permaliner Certified Installer
- Dancutter Robotic Cutter Certified Operator
- OSHA Trained and Certified
- Worker’s Compensation and Liability Insurance
Also see:
Additional Questions & Answers
How much does trenchless sewer repair cost?
Pipe lining costs can average between $100 to $450 per linear foot contingent on many factors. The total cost of the job will depend on various factors, such as the condition of the pipe, specific trenchless method used for the repair, ease of access and navigation, inspection methods, the amount of cleaning needed before the lining (e.g. hydro jetting and descaling). Some vendors may charge a minimum fee that equates to a minimum linear length of pipe.
How long does pipe lining last?
Approximately 50 years, which in most cases will be as long as a traditional pipe replacement, providing the existing pipe is a good candidate for lining (e.g. size, no missing parts, no sharp angles, pipe can withstand a thorough cleaning and descaling, pipe is not made of Orangeburg/tarpaper).
Closing Thoughts
We plan to write a follow-up piece sharing which route we eventually chose and how the project fared. In the meantime, we are in the process of getting competing bids, running through various budget scenarios and weighing our options.
UPDATE: Here is the second part of this series which shares our experiences with various types of contractors, as well as lessons learned from the proposal and diagnostic phase.
Trenchless Repair Resource Links
- Verified & Certified Trenchless Sewer Repair Contractors
- Sewer Contractors Listed on BuildZoom
- Waterline Renewal Technologies
- Repipe Lining Systems
- Pipe Lining Supply
- RIDGID Tools
- Dancutter USA Pipe Rehab Robotics
- A-1 Total Service Plumbing
- Sewer Pros
Recommended Reading
- Part 2: Non-Invasive Plumbing Tech: Bids, Proposals & Lessons Learned
- Part 3: Non-Invasive Plumbing Tech: How We Repaired Our Home Sewer Line
- Signs It May Be Time to Replace Your Piping
- How to Plan & Manage a Renovation Successfully
- Essential Elements of a Home Renovation Contract
- Why Prescriptive Maintenance is the Cure for Homeowner Headaches
- How to Choose a Qualified & Trustworthy Contractor
- How to Hire a Handyman Safely, Wisely & Virtually
- How to Increase Your Chances of Hiring a Good Contractor
- Signs of a Bad Contractor Before You Sign a Contract
| Purgula is reader-supported. When you click on links to other sites from our website, we may earn affiliate commissions, at no cost to you. If you find our content to be helpful, this is an easy way for you to support our mission. Thanks! Learn more. |


