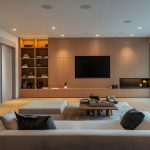

Every room in a house demands a unique balance of ambient, task, and accent light. The right lighting for a kitchen isn’t necessarily the right lighting for a bedroom, bathroom, foyer, or living room. A dining room table calls for intimate, glare-free warmth, while a kitchen island or a bathroom vanity demands high-visibility task precision. Each space has its own combination of activities, surfaces, proportions, and visual needs—and good lighting responds to those differences.
This article continues our exploration of residential lighting, drawing on key highlights and concepts from the IDCEC-registered Continuing Education Unit (CEU) “The Language of Lighting: Light Sources & Finding the Perfect Fit,” presented by Jack Inman, Showroom Manager at Palecek, at the Pacific Design Center in Los Angeles.
The CEU covered a remarkable amount of material, from the language of light and different light sources to color temperature, color rendering, lamp types, fixture selection, and practical considerations for different rooms and applications. Given that there was too much useful information to cover adequately in a single homeowner guide, we have divided the material into two complementary articles.
Our first article, A Homeowner’s Guide to Lighting, established the fundamentals: the three primary functions of light—ambient, task, and accent—along with lighting terminology, lamps and fixtures, lumens, Kelvin, CRI, LED technology, dimming, and the relationship between lighting, comfort, and wellness.
This second article focuses on putting those principles to work throughout the home. We’ve expanded on several topics from the CEU to make them more useful to homeowners, including how light interacts with surfaces, how beam direction and distribution affect a room, how fixture placement and scale influence the result, and what to consider when selecting lighting for specific spaces.
The goal isn’t to turn homeowners into lighting professionals. It’s to give you enough of the language and underlying principles to make better decisions—and to have more productive conversations with designers, electricians, lighting specialists, and other professionals when a project calls for their expertise.
Ultimately, lighting a home isn’t about finding perfect fixtures. It’s about understanding what each room needs—and knowing how different kinds of light can work together to make the space function and feel the way you want it to.
Enclosed is helpful guidance for placing, scaling, and hanging fixtures in the core spaces of your home.
Table of Contents
- The Foyer & Entryway
- The Dining Room
- The Kitchen Island
- The Living Room
- The Bathroom Vanity
- The Bathtub Oasis (Safety Standards)
- Controls and Smart Lighting
- Glossary and Quick Reference
Also see:
The Foyer & Entryway
Your entryway sets the tone for the entire home. The lighting here should feel grand and welcoming without overwhelming guests with blinding glare.
- The Sizing Formula: To find the perfect diameter for an entryway chandelier, use this simple decorator’s trick: add the room’s length and width in feet together. That total number matches the ideal width of your fixture in inches.
Room Length (in feet) + Room Width (in feet) = Ideal Fixture Width (in inches)
Example: An 8 foot × 12 foot foyer looks best with a 20-inch (8+12) wide chandelier.
- Hanging Height: The baseline standard is to hang foyer chandeliers a minimum of 7 feet (84 inches) from the floor to clear foot traffic safely.
- The Two-Story Foyer Exception: If you have a dramatic two-story entryway, ensure the chandelier hangs level with or slightly lower than the top of the second-floor landing so it visually anchors both floors.
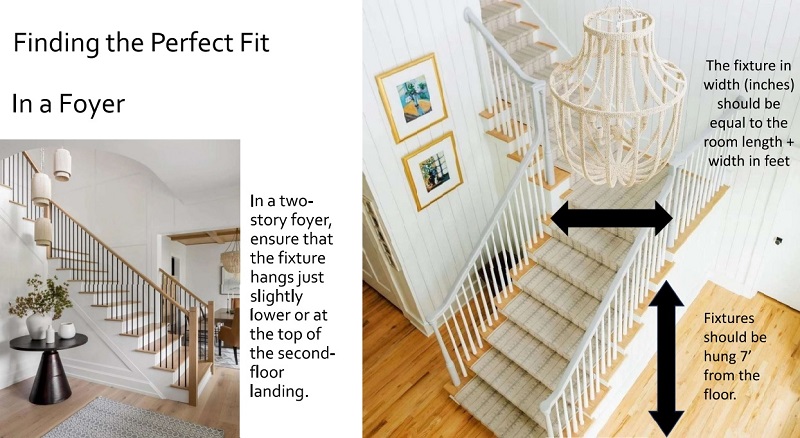
Palecek lighting guidance for Foyers & Entryways
Image courtesy of Palecek, Language of Lighting CEU
The Dining Room
Dining room lighting should focus heavily on creating an intimate mood. The table itself is the focal point, meaning the light should illuminate the faces of your guests and the food without casting harsh shadows.
- Round or Square Tables: Choose a central fixture that is at least 6 inches narrower than the table on each side. This ensures guests won’t accidentally bump their heads when standing up.
- Rectangular or Oval Tables: Linear fixtures or clustered pendants work beautifully over long tables. Start your spacing at least 6 inches inward from the outer edge of the table and space multiple fixtures evenly across the length.
- Hanging Height: Suspend the fixture 30 to 36 inches from the top of the table surface to the bottom of the luminaire.

Palecek lighting guidance for a Dining Rooms
Image courtesy of Palecek, Language of Lighting CEU
A Showroom Secret:
Multi-arm dining chandeliers can easily look too blinding at home. Borrow this trade secret from luxury showrooms:
Install lower-lumen bulbs (like 25-watt or 40-watt equivalents) to soften glare dramatically and create a warm, inviting glow that showcases the artistic material of your fixture.
The Kitchen Island
The kitchen island handles a massive burden: it serves as a detail-oriented food preparation zone, a casual homework station, and a social entertaining hub.
- Linear Fixtures: If you select a single, long linear light, ensure its total length is roughly 2/3 of the overall length of the island counter.
- Multiple Pendants: Space individual pendants 24 to 30 inches apart to distribute light evenly down the counter line.
- Counter Clearances: Maintain a minimum clearance of 4 to 6 inches from the outer edge of the island counter to the outer edge of your light fixtures.
- Hanging Height: Hang island pendants 30 to 40 inches above the countertop surface.

Palecek lighting guidance for Kitchen Islands
Image courtesy of Palecek, Language of Lighting CEU
The Living Room
The living room is a multi-functional sanctuary that requires highly independent layers. It is an opportunity to play with large-scale, statement fixtures.
- Placement: Center your primary statement fixture in the middle of the room or directly over the main conversational seating group.
- Scale up: When in doubt, scale up. Large public spaces look far more balanced with oversized, multi-tiered fixtures than with small, undersized lights. Two- and three-tier woven or structural fixtures make a high-end design impact.
- Hanging Height: Install living room chandeliers a minimum of 84 inches (7 feet) from the floor to maintain an open, expansive atmosphere.

Palecek lighting guidance for Living Rooms
Image courtesy of Palecek, Language of Lighting CEU
The Bathroom Vanity
The vanity mirror is your primary personal grooming station. The single most common mistake homeowners make is installing a single, harsh downlight directly over the mirror, which casts deep, unflattering shadows under the eyes and chin.
- The Flanking Rule: For flawless task lighting, place vertical wall sconces on both the left and right sides of the mirror. This creates cross-illumination that can completely eliminate shadows on your face.
- The Linear Exception: If you must use a horizontal light bar above the mirror, ensure the fixture is at least 3/4 the width of the mirror glass. For double sinks with large mirrors, mount a dedicated pair of evenly spaced linear sconces over each sink.
- Mounting Height: Mount vanity sconces so they sit roughly at eye level—ideally 60 inches from the floor to the center of the fixture’s backplate.
- The Color Sweet Spot: For applying makeup or grooming, use a warm-to-neutral color temperature of 2700K to 3000K with a 90+ CRI. This range accurately replicates natural daylight spectrums without looking sterile.
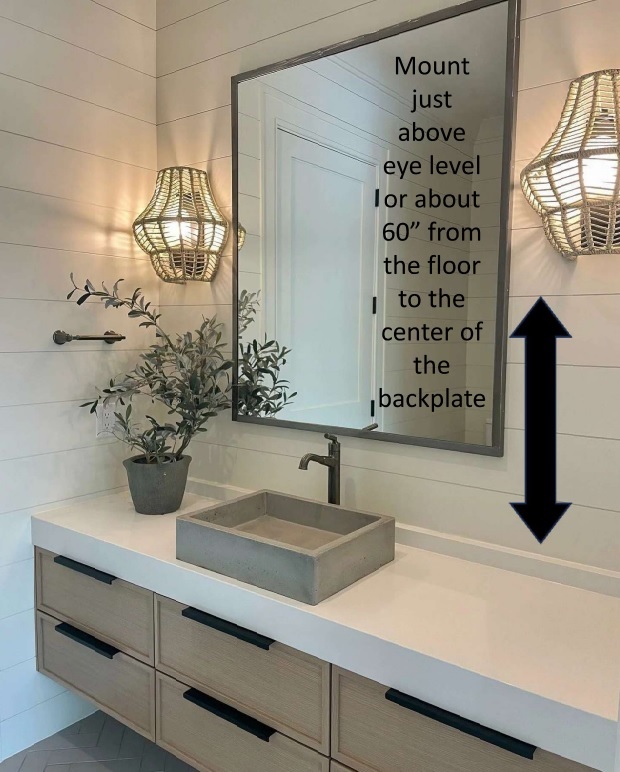
Palecek lighting guidance for Bathroom Vanities
Image courtesy of Palecek, Language of Lighting CEU
The Bathtub Oasis (Safety Standards)
Hanging a stunning woven or crystal chandelier over a freestanding bathtub transforms a bathroom into a private luxury spa. However, because water and electricity are a dangerous mix, homeowners must follow strict safety code boundaries.
- The 8-Foot Rule: The National Electrical Code (NEC) dictates that hanging light fixtures must clear the top rim of the bathtub by a minimum vertical distance of 8 feet. If your ceiling height does not allow for an 8-foot clearance, you must use a flush or semi-flush fixture instead of a hanging chain.
- Check Your Ratings: Any fixture installed in a bathroom environment must be marked for Damp Location or Wet Location use.
- Material Warning: A damp rating protects the hidden electrical wires and sockets (often utilizing premium ceramic housings) and guards metal components against rust. However, a damp rating does not protect raw natural materials like abaca fiber, grass cloth, or untreated wood from humidity warping. Always ensure your decorative trim choice is designed to handle moisture.
Controls and Smart Lighting
A beautiful light fixture is only as good as your ability to control it. If your home relies on standard, non-dimmable switches, your interiors are locked into a single, unyielding level of brightness from morning until night. Modern dimmers and smart control systems serve as the steering wheel for your home’s atmosphere—allowing you to alter the mood, manage energy usage, suppress glare, and automatically align your indoor lighting with your body’s circadian rhythm.
In this section, we break down how to smoothly integrate modern controls into your home without needing an advanced degree in electrical engineering:
- The Hierarchy of Control: From Dimmers to Smart Systems
- Wireless Ecosystems: Choosing Your Protocol
- Smart Lamps vs. Smart Switches: Which Path Is Best?
- The Magic of Scenes: Programming Your Day
- Showroom Checklist: Guarding Compatibility
The Hierarchy of Control: From Dimmers to Smart Systems
Residential lighting control generally falls into one of three distinct categories. Understanding where your project sits will help you plan your budget and coordinate with your electrician:
- Local/Standard Dimming: Individual wall box dimmers that control a single circuit of lights. Modern versions include C·L sliders or Electronic Low Voltage (ELV) switches engineered specifically to eliminate LED buzzing and flickering.
- Smart System Switches: Standard-looking wall switches that are internally packed with wireless chips. They replace your existing switches and connect to your home Wi-Fi network, allowing you to dim them via phone apps, voice assistants, or automated schedules.
- Centralized/Architectural Lighting Systems: The gold standard for custom homes or major renovations (such as systems by Lutron or Control4). All room dimmers are consolidated into a remote electrical closet, replacing a messy wall row of five individual switches with a single, clean, elegant engraved keypad.
Wireless Ecosystems: Choosing Your Protocol
If you opt for smart, network-connected lighting, your components must speak the same language. The smart home market relies on three primary wireless communication methods:
- Wi-Fi: Devices connect directly to your home router. It is highly convenient for a small apartment or single-room retrofits, but overloading your router with dozens of smart bulbs can slow down your home internet.
- Zigbee & Z-Wave: Specialized, low-power mesh networks. Devices do not crowd your Wi-Fi router; instead, they talk to each other and route commands through a central hub. This is highly stable for full-house smart conversions.
- Matter & Thread: The newest, unifying industry standard backed by Apple, Google, and Amazon. While Matter and Thread are improving interoperability, support remains feature- and ecosystem-dependent. Confirm that the exact device, bridge, dimmer, voice platform, and control features work together.
Smart Lamps vs. Smart Switches: Which Path Is Best?
Homeowners frequently struggle to decide whether they should buy individual smart bulbs or upgrade the physical switch on the wall. Each path serves a radically different design purpose:
Smart Lamps (Smart Bulbs)
- How It Works: The intelligence is built directly inside the light bulb itself (e.g., Philips Hue).
- The Benefit: Allows for individual bulb control, color-changing RGB capabilities, and personalized dynamic tuning.
- The Homeowner’s Trap: If a guest physically flips the wall switch to “Off,” the smart bulb loses all electrical power, disconnects from your network, and becomes completely unresponsive to smart schedules or phone controls.
Smart Switches & Dimmers
- How It Works: The intelligence lives inside the mechanical wall switch, controlling standard “dumb” bulbs or integrated fixtures.
- The Benefit: The switch stays connected to your smart network 100% of the time, regardless of whether the lights are currently on or off. Anyone can use the wall paddle normally without disrupting your automation.
- The Limitation: You cannot alter individual bulb colors or isolate single lights on a shared multi-bulb chandelier circuit.
The Magic of Scenes: Programming Your Day
The real power of lighting controls emerges when you move past turning individual lights on or off and begin programming “Scenes.” A scene coordinates multiple light layers across a room to activate simultaneously with a single tap or automated schedule:
- The “Morning Cook” Scene: Sets kitchen under-cabinet task lights to 100% and island pendants to a crisp, neutral 3000K to promote daytime alertness.
- The “Dinner Party” Scene: Automatically dims the ambient recessed cans down to 20%, lowers the dining chandelier to a soft, intimate glare-free glow, and activates accent picture lights to highlight artwork.
- The “Midnight Pathway” Scene: Programmed to trigger if a button is pressed between 11 PM and 5 AM. It activates hallway and bathroom guide-lights to a soft, ultra-warm 2200K amber at just 10% brightness, allowing you to safely navigate without shocking your eyes or disrupting your melatonin.
Showroom Checklist: Guarding Compatibility
Because LEDs rely on a complex interaction between internal drivers and external dimmers, you must double-check compatibility before purchasing hardware. Take this checklist with you to the showroom:
- Is the fixture explicitly labeled “Dimmable”?
- What dimming protocol does the fixture require? (Ask if it uses standard forward-phase/TRIAC, reverse-phase/ELV, or commercial 0-10V wiring).
- Does the switch match the load? Ensure your total circuit wattage doesn’t exceed the switch’s rating.
- Is a neutral wire required? Most modern smart switches require a “neutral wire” inside the wall box to keep the switch continuously powered. If your home was built before the mid-1980s (or even up to 2011), you should have an electrician inspect the actual box. Home age alone does not prove whether a neutral is present, as layout styles varied dramatically.
Glossary and Quick Reference
The final step to mastering the language of residential lighting is learning how to navigate the technical jargon used on construction sites and invoice receipts. When an electrician or showroom representative uses trade acronyms, you shouldn’t have to guess what they mean. Use this section as your translation manual and troubleshooting blueprint.
Translating Your Lighting Contractor’s Terminology
- Aperture: The physical opening of a recessed downlight through which the light shines. A smaller aperture (e.g., 2-inch vs. 4-inch) creates a cleaner, more minimalist ceiling line.
- Baffle: A grooved interior trim inside a recessed light fixture designed to absorb excess light rays, reducing distracting glare and smoothing out the beam edge.
- Beam Spread: The physical angle of a cone of light pouring out from a directional bulb, determining whether a light functions as a tight pinpoint spotlight or a wide floodlight.
- Canopy: The decorative metal plate that mounts flat against the ceiling to completely conceal the electrical wiring box and support a hanging chandelier or pendant.
- Driver: The vital electronic brain of an LED fixture. It converts high-voltage alternating current (AC) household electricity into low-voltage direct current (DC), preventing your lights from burning out.
- Diffuser: A translucent glass, fabric, or plastic lens fitted over a light source to scatter raw rays evenly, softening shadows and eliminating harsh, pinpoint glares.
- Integrated Fixture: A modern lighting unit where the LED chips and driver are completely built into the physical architecture of the hardware, removing the need for a traditional screw-in bulb.
- Junction Box (J-Box): The protective metal or plastic box hidden inside your ceiling or wall where household electrical wires connect to your light fixture’s wiring.
- Load: The total amount of electrical power (measured in Watts) drawn by all the lightbulbs attached to a single electrical circuit or wall dimmer switch.
- Sconce: A decorative wall-mounted light fixture that directs light upward, downward, or outward to deliver soft ambient illumination or focused task lighting.
- Transformer: A mechanical device used in low-voltage systems (like under-cabinet tracks or landscape lighting) to step standard 120-volt household electricity down to a safe 12 or 24 volts.
Lighting Showroom & Job Site FAQs
Q: My box says “Title 24 Compliant” or “JA8 Certified.” What does that mean for me?
A: This is a strict energy efficiency and color quality standard originating from California’s Title 24 Building Energy Efficiency Standards. For homeowners nationwide, seeing a JA8 or Title 24 label on a bulb box is a badge of quality. It legally guarantees that the bulb features an excellent 90+ CRI, maintains steady dimming down to at least 10% without buzzing, and is highly energy efficient. It is convenient shorthand to detect a premium product.
Q: Can I mix different metal finishes (like brass, black, and nickel) within the same room?
A: Yes, absolutely. In fact, professional lighting designers heavily discourage matching every single light fixture metal perfectly, as it can make a home feel like a sterile commercial showroom.
- The Rule of Thumb: Select one dominant metal finish (e.g., matte black) to cover roughly 60% to 70% of your hardware and plumbing fixtures. Then, choose a complementary accent metal (e.g., brushed brass or polished nickel) for your secondary statement decorative fixtures to add layer, personality, and visual texture.
Q: How do I know if my existing home wiring can handle a heavy hanging chandelier?
A: Standard plastic or metal ceiling junction boxes are only rated to hold fixtures weighing up to 50 pounds. If you fall in love with a massive, multi-tier woven, solid wood, or crystal statement chandelier that exceeds this weight, national electrical code dictates that your electrician must swap out your standard box for a heavy-duty, braced fan-rated or fixture-rated junction box secured directly to the structural wood framing of your home.
Related Lighting Articles
- 4 Easy Home Improvements That Only Take a Day
- 10 Practical Home Upgrades for Vibrant Aging in Place
- How to Add Character to Your Home with Outdoor Lighting
- Is Uplighting or Downlighting Better for Your Property?
- How to Deal With Glare on a Waterfront Property
- Related Topics: Lighting | Wellness | Curb Appeal | Indoor-Outdoor Living
| Purgula is reader-supported. When you click on links to other sites from our website, we may earn affiliate commissions, at no cost to you. If you find our content to be helpful, this is an easy way for you to support our mission. Thanks! Learn more. |